Unlocking Pure Indulgence: The Magic of Homemade Peanut Butter Cups
Are you a devoted fan of that classic, irresistible combination of rich chocolate and creamy peanut butter? If so, prepare to embark on a culinary journey that will transform your sweet tooth forever. Forget the candy aisle; we're talking about homemade peanut butter cups, a treat so utterly delightful, so surprisingly simple, and so profoundly satisfying, you'll wonder why you ever settled for store-bought.
For many, Reese's Peanut Butter Cups hold a special, nostalgic place in their hearts. They’re a quintessential candy that evokes childhood memories and instant gratification. But what if we told you that the homemade version isn't just a passable substitute, but a significant upgrade? Imagine a treat that's richer, creamier, boasts a more profound flavor, and is crafted with ingredients you know and trust. This isn't just a recipe; it's an invitation to experience peanut butter perfection, tailored precisely to your taste.
The beauty of this no-bake marvel lies in its simplicity. Requiring minimal effort and about 20 minutes of active prep time, these quick & budget-friendly homemade peanut butter cups are perfect for a spontaneous craving, a family baking project, or impressing guests with a gourmet-level dessert that secretly took no time at all. Once you taste the difference, the humble candy aisle will likely lose its allure.
Why Homemade Peanut Butter Cups Reign Supreme: Better Than the Candy Aisle
When you're deeply enamored with a classic like Reese's, it's natural to question whether a homemade alternative can truly measure up. After extensive testing and a genuine love for the original, we can confidently say that these homemade peanut butter cups don't just measure up—they often surpass their commercial counterparts in multiple, delicious ways. Here’s why diving into DIY is a game-changer:
Superior Taste & Texture
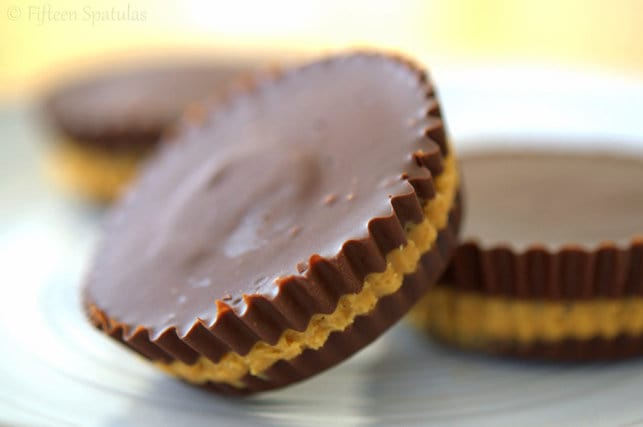
- Unrivaled Creaminess: The filling in homemade versions achieves an unparalleled smoothness and richness that's hard to replicate commercially. You control the exact ratio of ingredients, leading to a velvety, melt-in-your-mouth peanut butter core.
- Premium Chocolate Experience: This is where the homemade advantage truly shines. Store-bought candies often use "compound chocolate" – a mix of cocoa, vegetable fats, and sweeteners – which lacks the depth and snap of real chocolate. With homemade, you get to choose high-quality chocolate chips or bars (semi-sweet, milk, dark, or even a blend!), resulting in a richer, more authentic chocolate shell that melts beautifully.
- Perfectly Balanced Sweetness: Commercial candies can sometimes be cloyingly sweet. Crafting your own allows you to adjust the sugar content in both the peanut butter filling and the chocolate coating, achieving a harmonious balance that's rich without being overwhelming.
Healthier & Less Processed Ingredients
One of the most compelling reasons to go homemade is the control you gain over what goes into your body. Store-bought treats, while convenient, often contain a laundry list of unfamiliar ingredients. When you make them yourself, you know exactly what you're consuming:
- Fewer Artificial Additives: Say goodbye to preservatives like TBHQ, artificial flavors, and colors. Your kitchen-made cups rely on the natural deliciousness of simple, wholesome ingredients.
- Natural Peanut Butter Options: You can opt for natural peanut butter with just peanuts and salt, avoiding added sugars, hydrogenated oils, and stabilizers often found in conventional brands. This not only enhances the flavor but also aligns with a less-processed diet. For more on this, check out our guide on Less Processed Homemade Peanut Butter Cups: Natural Ingredients.
- Controlled Sugar Content: Reduce the overall sugar without sacrificing flavor, allowing the natural notes of chocolate and peanut butter to truly sing.
Budget-Friendly & Incredibly Easy
- Cost-Effective Indulgence: Pound for pound, making your own homemade peanut butter cups is significantly cheaper than repeatedly buying name-brand versions. Basic ingredients like peanut butter, butter, powdered sugar, and chocolate chips are pantry staples and go a long way.
- No-Bake Simplicity: The "no-bake" aspect is a huge win. No oven preheating, no complicated techniques. This recipe is designed for ease, making it a perfect entry point for beginner bakers or a fun activity with kids.
- Quick to Prepare: From start to finish, the active preparation time is incredibly short, often around 20 minutes. The longest wait is merely for chilling, which is entirely hands-off.
The Simple Magic: What You'll Need
You might be surprised at how few ingredients are required to create such an extraordinary treat. The key isn't in complexity, but in the quality of these essential components. A handful of pantry staples is all it takes:
- Peanut Butter: Opt for a good quality creamy peanut butter. While natural peanut butter works wonderfully, ensure it's well-stirred if separated, or choose a no-stir variety for easier handling. The rich, nutty base is crucial.
- Butter: Unsalted butter is preferred, as it allows you to control the saltiness of your filling. It provides essential fat for creaminess and helps bind the peanut butter layer.
- Powdered Sugar (Confectioners' Sugar): This fine sugar is essential for achieving that silky-smooth, melt-in-your-mouth texture in the peanut butter filling, without any graininess.
- Vanilla Extract: A touch of vanilla enhances the overall flavor profile, adding a subtle warmth and depth that complements both the chocolate and peanut butter.
- Chocolate Chips: A blend is often ideal for the perfect chocolate shell. Semi-sweet chocolate chips provide a classic flavor, while a touch of milk chocolate chips can add extra creaminess and a slightly sweeter profile. Dark chocolate can also be used for a more intense, less sweet cup.
- Optional (but Recommended!): A pinch of sea salt for sprinkling on top – it beautifully contrasts and enhances the sweetness.
Pro Tip: Using high-quality chocolate chips (look for brands with fewer ingredients and a higher cocoa content) will elevate your cups from good to absolutely phenomenal. The difference is truly palpable.
Crafting Your Masterpiece: A Step-by-Step Guide to Homemade Peanut Butter Cups
The process of making these delightful homemade peanut butter cups is incredibly straightforward, perfect for even the most novice of cooks. Here’s how you'll bring them to life:
Step 1: Prepare Your Peanut Butter Filling
In a medium mixing bowl, combine your creamy peanut butter, softened butter, powdered sugar, and vanilla extract. Use an electric mixer or a sturdy spoon to mix until thoroughly combined and smooth. The mixture should be firm enough to handle but still soft and pliable. If it seems too sticky, add a touch more powdered sugar; if too dry, a tiny bit more melted butter or peanut butter.
Step 2: Melt the Chocolate
In a separate microwave-safe bowl, combine your chosen chocolate chips (and any extra peanut butter you're adding to the chocolate layer, if desired). Microwave in short bursts to prevent scorching. Start with 1 minute, stir well, then continue heating in 20-30 second intervals, stirring vigorously after each, until the chocolate is completely melted and beautifully smooth. Alternatively, you can use a double boiler on the stovetop for a more controlled melt.
Important Note: Always melt chocolate slowly and gently. Overheating can cause it to seize and become thick or grainy.
Step 3: Assemble Your Cups
Line a mini muffin tin (or standard muffin tin for larger cups) with paper liners. This step is crucial for easy removal and neat presentation.
- First Chocolate Layer: Spoon a small amount (about 1-2 teaspoons for mini cups) of the melted chocolate into the bottom of each lined cup. Gently tap the muffin tin on your counter to help the chocolate settle evenly and create a flat base.
- Peanut Butter Filling: Take small portions of your peanut butter mixture and roll them into a ball, then slightly flatten into a disc. Place one disc on top of the first chocolate layer in each cup. Don't press too hard; just gently settle it.
- Second Chocolate Layer: Spoon more melted chocolate over the peanut butter filling, ensuring it completely covers the peanut butter and reaches the edges of the liner. Gently tap the tin again to smooth the top.
- Optional Finish: If desired, sprinkle a tiny pinch of sea salt on top of the wet chocolate for a delightful salty-sweet contrast.
Step 4: Chill and Enjoy!
Once all your cups are assembled, place the muffin tin in the refrigerator for at least 30 minutes, or until the chocolate is firm and set. You can also pop them in the freezer for about 15-20 minutes for a quicker set. Once firm, peel off the paper liners, and your homemade peanut butter cups are ready to be devoured!
Beyond the Basics: Tips for Perfection & Customization
While the basic recipe is foolproof, a few extra tips and tricks can elevate your homemade peanut butter cups from great to absolutely legendary. And the beauty of making them yourself? The endless possibilities for customization!
- Choosing Your Peanut Butter: For a richer, more intense peanut butter flavor, opt for natural, unsweetened peanut butter. If using a very oily natural peanut butter, you might want to drain a tiny bit of the oil before mixing, or compensate with slightly more powdered sugar to maintain consistency.
- Perfecting the Chocolate Shell:
- Tempering (Advanced): For a truly glossy, snappy chocolate shell that resists melting at room temperature, consider learning how to temper chocolate. It requires a bit more effort and a thermometer but yields professional results.
- Different Chocolates: Experiment with white chocolate, dark chocolate (70% cocoa or higher), or even a combination. You can also add a hint of espresso powder to the chocolate for an intriguing mocha twist.
- Thin Shells: For a thinner chocolate shell, use less chocolate in the initial layer and spread it thinly. Dip a pastry brush in melted chocolate and paint the inside of the liners if you want very thin, uniform shells.
- Creative Fillings & Toppings:
- Crunch Factor: Mix crispy rice cereal, crushed pretzels, or chopped roasted peanuts into your peanut butter filling for an added textural dimension.
- Flavor Boosters: A dash of cinnamon, a pinch of chili powder, or a swirl of caramel or jam within the peanut butter layer can create unique flavor profiles.
- Gourmet Toppings: Before the chocolate sets, sprinkle with fancy sea salt flakes (like Maldon), colorful sprinkles, chopped nuts, or even a drizzle of white chocolate.
- Storage Savvy: Store your homemade peanut butter cups in an airtight container in the refrigerator for up to 1-2 weeks. They are also freezer-friendly! Freeze them solid on a baking sheet, then transfer to a freezer-safe bag or container for up to 2-3 months. Thaw slightly before enjoying for the best texture.
- Troubleshooting Common Issues:
- Oily Peanut Butter Layer: This often happens with very runny natural peanut butter. Try mixing in a bit more powdered sugar or chilling the peanut butter mixture briefly before shaping.
- Chocolate Seizing: If your chocolate becomes thick and clumpy, it usually means water got into it, or it was overheated. Always use dry utensils and bowls, and melt gently.
Why You'll Never Go Back to Store-Bought
Once you've experienced the rich, authentic flavor and satisfying texture of homemade peanut butter cups, it's hard to return to the commercial alternatives. The ability to control ingredients, reduce processed elements, save money, and tailor the taste exactly to your preference creates an entirely new level of enjoyment. This isn't just about making a dessert; it's about reclaiming a beloved treat, infusing it with personal care, and discovering a truly superior indulgence.
So, clear your counter, gather your simple ingredients, and prepare to be amazed. These easy, no-bake homemade peanut butter cups are more than just a recipe—they're a revelation. Dive in, get creative, and savor every single, glorious bite!
